Saturday 31 December 2016

SharePoint Farm Configuration details

Make sure you have the SharePoint Farm Configuration details in your DR activity battle box
Go to codeplex website and download SPSFarmReport preferably on the SharePoint CA server (FE Server) or any one of the SP Farm
http://spsfarmreport.codeplex.com/

SPSFarmReport\SPSFarmReport\o15
Execute the PowerShell script file SPSFarmReport.ps1 via elevated PowerShell window using the account which has privilege to all farm including BE. This will generate an output XML file "2013SPSFarmReport11102016-40757.xml" in the same folder where the script file is located. Open the xml file using in IE. SP2013 Farm Configuration will be listed in detail.

Setup recovery vault for resource manager-deployed virtual machines & backup-snapshot on Azure

Taking Snapshots and VM Backups on Azure Cloud – Prepare environment by creating recovery vault on Azure portal (Resource Manager Model & Classic Model)
steps to create recovery service vault:


To recover a VM to a point in time follow the steps

Working with Shared Calendars in Outlook

Create meetings, inviting required attendees, resources, or yourself. Save as iCalendar Format, send to Employees and Track the changes
 

Eymantec Enterprise Vault: Exporting Single/ Bulk User to pst File and Deleting the Archive

Problem

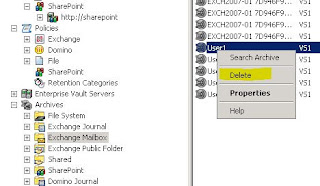
How to export an archive in detail while removing items from the vault in order to expedite the delete archive process. The current process is to right click the archive and select delete. This will eventually remove the archive however this process could take up to 45 days to fully remove the archive. A faster way is described below.

Cause

Archives that are "Marked for deletion" can take 30 days or longer depending on the policy settings to actually delete the archive.

Solution

In order to delete existing archives in the shortest amount of time we must export the items to a PST while removing items from the vault.
use the PST Export wizard as outlined below to clear the archive of the archived items which will speed up the process of deleting the archives to free up needed storage.
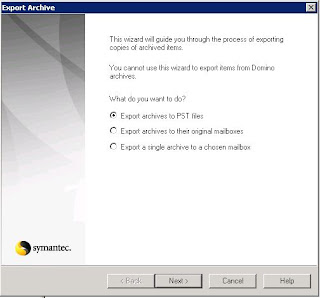
1. Open the Enterprise Vault Console, right click on "Archives" then choose "Export". The Export wizard will open.


Select "Export Archives to PST", then click "Next"

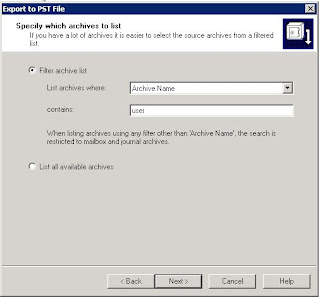
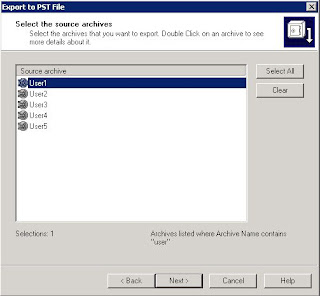
2. Select the archive you wish to export then Click "Next".


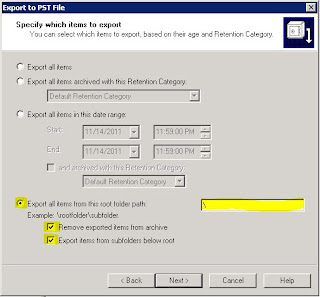
3. Select the highlighted items to export all items under the root folder and remove the items from the archive. This will produce a 0 item archive that can be deleted quickly. Click "Next".


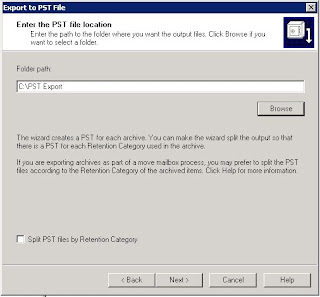
4. Choose the location to store the PST, keep in mind PST files can be rather large so ensure the destination drive has more than enough space available to store these PST files. Click "Next".


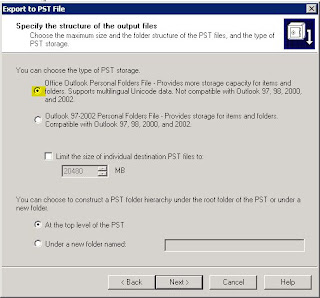
5. Select the size if you wish to burn CD media, or a single file. Also choose the type of PST to export, PSTs from Outlook 2003-2010 will us the Personal File Folder format. Click "Next".


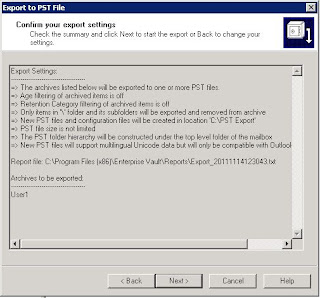
 6. Review your PST export settings, click the "Back" button if changes need to be made. Else click "Next" to start the export.

7. After the export is complete a quick search of the archive should return "0" items exist in the vault. (From the EV server pen Internet Explorer and type this url:

http://localhost/enterprisevault/search.asp

Select the exported user archive, then click the "Search" button without entering any search criteria.

8. After verifying the archive has "0" items, then you can delete the archive.


9. Once the archive has been "Marked For Deletion" a quick restart of the storage service on the Ev server should remove the archive.


Friday 30 December 2016

Slipstreaming Patches into SharePoint 2013

Slipstreaming Patches into SharePoint 2013

Category: SharePoint 2013
Now that the latest CU is out we have a patch to play with. And this isn’t a normal patch. This patch is important. It will have to be installed in order to install any future patches. You should consider this the base version of SharePoint 2013, especially for new farms. One of the first things I wanted to test was slipstreaming the patch. The news was good, it’s the same process we used with SharePoint 2010. Just extract the update files into the Updates directory before you install SharePoint 2013. Nothing to it.
Let’s see how it looked when I did it. Here is what my directory structure looked like:

I copied the files from the SharePoint 2013 ISO into a folder in C:\Install. On a production system you would put this on a non C drive. After I copied the files over I peeked into the updates folder to see what’s in there. This is what I found:

That sounds delightful, let’s drop a patch in there and see what happens.
Extracting SharePoint 2013 patches follows the same process as SharePoint 2010, which you can find outlined in this brilliant blog post. Those are the instructions I used when writing this blog post. First I verified the March 2013 PU supported this.

Looks like it does. Let’s go ahead and extract it to our updates folder. After we accept the license terms our updates folder gets full of patch files.
Then install SharePoint 2013 the same way you normally would.

Please consider the environment before printing this email.
Disclaimer: This email and any attachment are confidential to the person to whom they are addressed.
If you are not the intended recipient, please inform the sender and delete the email and any attachment from your systems, without copying, forwarding or disclosing them.
WARNING: You should check this email and any attachments for the presence of viruses. The sender accepts no liability for any damage caused by any virus transmitted by or with this email.

Safely delete files in the %windir%Installer directory

Can you safely delete files in the %windir%Installer directory?

Removing items from the Windows component store to save space, a couple of questions come in about the Windows\Installer directory. This is a hidden system directory; it is used by the Windows Installer service to cache installer data files for various applications. Over time, this directory will grow and can eventually take up an amount of space that might cause pressure on thinly provisioned storage, such as virtual hard disks.

So, the question usually asked is: Can I safely remove the files in this directory? The answer is blatantly NO. So let's talk about why this is a bad idea.

First, it is not supported. If you remove files from this directory and have issues, you may need to reinstall the application to get back to a good state. Therefore, that would suck for both you and the engineer that needs to deliver that message.

Second is the overall idea that you really should not remove items in the Windows directory. We build and test our software based on the existence of specific files and directories. When those files and directories dont exist, bad things can and will happen. However, that is a generalization that usually upsets many people so let's be more specific. This particular directories job is to act as a cache location for Windows installer based applications. It holds stripped down versions of the Windows installer data files. During application install, update of the application or application removal, this directory is used by the application to confirm the existence of previously installed items to determine the next steps the installer needs to take. The files are different from machine to machine, so if you expect to delete the files in the directory and then copy them over from another machine, that would be incorrect. Removing items from here could cause you to have application crashes, or worse, require the reinstallation and patching of the application.

The proper way to alleviate space pressure in this directory is to uninstall any unneeded applications.

I hope that this makes sense and you can see why removing files from this directory can cause you unneeded pain. Plan your future space requirements based on your operating system and application needs and you can alleviate many of these types of issues before they occur.

How to extend concurrent RD connections - Windows Server 2012

How to extend the number of concurrent RD connections in Windows Server 2012

As we understand that only 2 concurrent remote desktop connection is allowed on a server, below procedure will allow you to extend the concurrent connection from 2 to many.

To allow multiple users connecting Remote Desktop to one server you need to enable an RD Session Host server. For this, you must first install the RDS role on the Windows server from Server Manager. Then install the RD Session Host Role Service. As you go through the installation, you’ll have to:
  * Choose whether to require Network Level Authentication (NLA) for logons. NLA enables user authentication before creating a full session on the RD Session Host server. This provides both faster logon and protection from intentional connection storms that could lead to a Denial of Service (DoS).
< * Add the user groups you wish to allow access to the RD Session Host server on the Remote Desktop Users group on the server.
< * Configure user experience options by allowing (or disabling) audio and video playback, audio recording and Desktop Composition (enabling Desktop Composition enables Aero features).
< * Specify a license mode for the server. Each user or device needs a license to connect to an RD Session Host server. Choose licensing Per User or Per Device for these connections. You don’t have to set up a license server right away because there is a grace period.


Remote Desktop Services provides a licensing grace period for the RD Session Host server during which no license server is required. During this grace period (for Windows Server 2012, Grace period is 120 Days), an RD Session Host server can accept connections from unlicensed clients without contacting a license server. The grace period begins the first time the RD Session Host server accepts a client connection. The grace period ends after whichever of the following occurs first:
< * A permanent RDS CAL is issued by a license server to a client connecting to the RD Session Host server.
< * The number of days in the grace period is exceeded.


To check grace period balance, you can run tlsbln.exe in the command prompt of the server you are trying to give remote desktop connection.

Enable JavaScript in Windows

Enable JavaScript in Windows Internet Explorer

This is very much required to run several accessment tools; like to run RAP Tools successfully we require this to be enabled too.
To allow all websites within the Internet zone to run scripts within Internet Explorer:
  1. On the web browser menu, click Tools or the "Tools" icon (which looks like a gear), and select Internet Options.
  2. When the "Internet Options" window opens, select the Security tab.
  3. On the "Security" tab, make sure the Internet zone is selected, and then click on the "Custom level..." button.
  4. In the Security Settings – Internet Zone dialog box, click Enable for Active Scripting in the Scripting section.
  5. When the "Warning!" window opens and asks, "Are you sure you want to change the settings for this zone?" select Yes.
  6. Click OK at the bottom of the Internet Options window to close the dialog. 
  7. Click the Refresh button to refresh the page and run scripts.
To allow scripting on a specific website, while leaving scripting disabled in the Internet zone, add the specific Web site to the Trusted sites zone:

  1. On the web browser menu, click Tools, or the "Tools" icon (which looks like a gear) and select Internet Options.
  2. When the "Internet Options" window opens, select the Security tab.
  3. On the "Security" tab, select the Trusted sites zone and then click the Sites button.
  4. For the website(s) you would like to allow scripting, enter the address within the Add this website to the zone text box and click Add. Note: If the address does not begin with "https:", you many need to uncheck "Require server verification (https:) for all sites in this zone".
  5. Click Close and then click OK at the bottom of the Internet Options window to close the dialog.
  6. Click the Refresh button to refresh the page and run scripts.

Create a Bootable USB Flash Drive/ Pendrive

Create a Bootable USB Flash Drive

You can create a bootable USB flash drive to use to deploy Windows OS. The first step is to prepare the USB flash drive by using DiskPart, which is a command-line utility. For information about DiskPart, see DiskPart Command-Line Options.

To create a bootable USB flash drive

  1. Insert a USB flash drive into a running computer.
  2. Open a Command Prompt window as an administrator.
  3. Type diskpart.
  4. In the new command line window that opens, to determine the USB flash drive number or drive letter, at the command prompt, type list disk, and then click ENTER. The list disk command displays all the disks on the computer. Note the drive number or drive letter of the USB flash drive.
  5. At the command prompt, type select disk <X>, where X is the drive number or drive letter of the USB flash drive, and then click ENTER.
  6. Type clean, and the click ENTER. This command deletes all data from the USB flash drive.
  7. To create a new primary partition on the USB flash drive, type create part pri, and then click ENTER.
  8. To select the partition that you just created, type select part 1, and then click ENTER.
  9. To format the partition, type format fs=ntfs quick, and then click ENTER.
  10. Type active, and then click ENTER.
  11. Type exit, and then click ENTER.
  12. When you finish preparing your custom image, save it to the root of the USB flash drive.

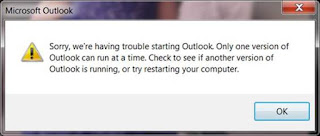
Outlook crashes with error message "Only one version of Outlook can run at a time"


Check if multiple process of Outlook.exe is running in the task manager.
· Press Ctrl+Alt+Del, and then chose Task Manager.
· Under processes tab look for Outlook.
· If you find the Outlook process running, right click on it and end the process.
If you do not see multiple process running in the background, then try opening Outlook in safe mode and check the result:
·         Hold Windows key + R.
·         Copy and paste, or type the following command in the Open box, and then press Enter:
Outlook /safe
Note: There is space between Outlook and /.

Shared Sent visibility

Exchange’s shared mailbox won’t save your sent or deleted Items in its mailbox owner

You must add a DWORD = 1 value or update any value it already exists for the sent mails to go to its respective mailbox.


HKEY_CURRENT_USER\Software\Microsoft\Office\version]\Outlook\Preferences\DelegateSentItemsStyle